Wednesday, September 26, 2012

Pumpkin Pancakes with Apple Cider Syrup

Yay for fall!  I have been waiting all summer to test our some of the fall-time recipes I never got to last year.  This one is phenomenal!  For the first time, we pressed our own cider at a local farm, and it pretty much rocks my world :)
 Yes, we gathered the apples, washed them by hand, ground them, pressed them, and jugged them up from start to finish. 
And how in the world am I going to enjoy the fruits of my labor?  Well on pancakes of course!  These pancakes seem too good to be a breakfast, more of a dessert-type meal.  It is DEFINITELY worth the indulgence!  The pumpkin pancakes were lite and airy, and the syrup just simply rocked...enough said. Onto the recipe....

Pumpkin Pancakes with Apple Cider Syrup


Apple Cider Syrup

3/4 Cup sugar
1/4 cup brown sugar
2 TBs cornstarch
1/2 tsp ground cinnamon
1/4 tsp ground nutmeg
2 cups fresh apple cider (or juice would work)
1 Tbs fresh lemon juice
1/2 tsp vanilla
1/4 cup butter

Mix sugars, cornstarch, cinnamon and nutmeg well. Add apple cider, vanilla, and lemon juice. Bring to a boil and continue boiling for 1 minute, stirring constantly. Remove from heat and stir in butter. Store leftovers in the refrigerator, use within a week or two.

Pumpkin Pancake Recipe

2 cups flour (I use at least 1/2 freshly ground white wheat flour)
3 Tb brown sugar
2 tsp baking powder
1 tsp baking soda
1 tsp ground all spice
1 tsp ground cinnamon
1/2 tsp ginger
1/2 tsp salt
1 1/2 cup buttermilk (I do an overflowing 1/2 cup)
1 cup pumpkin puree
2 eggs
2 Tb canola oil
2 Tb vinegar

In one bowl mix together the buttermilk, pumpkin, eggs, oil and vinegar. Combine dry ingredients separately and them stir into pumpkin mixture just until combined. Heat your pan or griddle (lightly butter or oil if it is not seasoned), using about 1/4 cup for each pancake. Brown on both sides and serve hot with apple cider syrup.

Recipe Source:  The Sisters Cafe

Tuesday, September 25, 2012

Copykat Kneaders Pumpkin Chocolate Chip Bread


I have yet to go to Kneaders (I know....I'm sure you are all gasping).  I don't live in Utah, and that doesn't help by any means.  Hopefully this will change very soon!  There is one going being built close to my parents house, so next time we visit I'll have to check it out finally.  What I have heard is that it is amazing!  I am excited to try some of their baked goods, sandwiches, and breakfast!  

If this bread is any indication of how good the restaurant is, I can't wait to try the other delicacies they have :)  This bread recipe has more pumpkin than other recipes I have tried recently, and is so moist and  delicious.  You won't be disappointed.  Make up a batch, give 2 loaves to friends and you will still have one for yourself.  Your friends will love you :)  Happy Fall baking!


Copykat Kneaders Pumpkin Chocolate Chip Bread


3-⅓ cups unbleached all purpose Flour
1 tsp pumpkin pie spice
1 tbsp Cinnamon
2 teaspoons Baking Soda
1 teaspoon Baking Powder
1-½ teaspoon Salt
2-⅔ cups Sugar
⅔ cups Softened Butter
4 whole Eggs
1 pound (or 1 30oz can or 2 15oz cans) Mashed Pumpkin
⅔ cups Water
1 cup Semi-Sweet Chocolate Chips 

Preheat oven to 325 degrees.

Sift together dry ingredients and set aside. Cream sugar and butter until well incorporated. Add eggs one at a time and then add the mashed pumpkin. Alternate adding dry ingredients with water. Fold in chocolate chips.

Pour into three large greased bread pans and bake at 325 degrees for 55 to 60 minutes or until a toothpick inserted into the middle of the loaf comes out clean.

Makes 3 loaves.

Recipe Source:  Burnt Apple

Friday, September 21, 2012

Pumpkin Bread with Pumpkin Buttercream and Caramel Drizzle


Ready or not here come the pumpkin recipes!  This first was is a good one to start with for the season.  I made a couple loaves for my husband to take to work, and they all loved this yummy moist bread (which is delicious on its own).  Then comes the pumpkin buttercream....oh the pumpkin buttercream!  I may or may not have eaten a few spoonfuls of this on its own :)

Pumpkin Bread with Pumpkin Buttercream and Caramel Drizzle

Bread:

1 3/4 cups all-purpose flour
1 1/2 teaspoons ground cinnamon
1 teaspoon baking powder
1 teaspoon baking soda
1/2 teaspoon salt
1/2 teaspoon ground nutmeg
1/2 teaspoon ground allspice
2 large eggs
3/4 cup packed dark brown sugar (I substituted light brown sugar)
1/3 cup granulated sugar
2 teaspoons freshly grated orange zest (I omitted this)
1 teaspoon freshly grated lemon zest (I left this out, too)
1/2 cup canola oil
1 1/4 cups canned pure pumpkin puree
1/2 cup chopped, toasted pecans or walnuts, optional (I didn’t add the nuts to the batter, but sprinkled them on top of the frosted loaf instead)

Pumpkin Buttercream Frosting:

1/4 C butter, softened
2 tbsp pumpkin puree
1/2 tsp cinnamon
1/2 tsp vanilla
1 1/2 C confectioner's sugar, sifted
2 tsp milk

For the  Caramel Drizzle:

3 tbsp brown sugar
1 tbsp water
1 tbsp butter
1/4 tsp salt

Position your oven rack in the middle of the oven, and preheat oven to 325 degrees. Grease and flour a 9 x 5″ loaf pan; set aside.
Combine flour, cinnamon, baking powder, baking soda, salt, nutmeg, and allspice in a medium bowl and whisk until thoroughly combined; set aside.
In another bowl, or bowl of an electric mixer, beat eggs on medium-high speed for two minutes or until lightened in color. Add the brown sugar, mixing for about 2 minutes, then the granulated sugar, mixing for about 1 minute. Add the orange and lemon zests, if using, and beat for another minute. Scrape down the bowl as needed.
Drizzle in the canola oil with beater on medium-low. Reduce speed to low and add the pumpkin puree. Mix until thoroughly combined. Add the dry ingredients in two additions and blend for 10-15 seconds just until incorporated. Fold in the pecans using a rubber spatula.
Spoon the batter into your prepared loaf pan and bake for 60-65 minutes or until a toothpick inserted in center comes out clean. Cool loaf in pan for 10 to 15 minutes, then remove and cool completely on a wire rack.
While bread is cooling, begin preparing the frosting. Cream together butter and pumpkin puree. Add in cinnamon and vanilla and beat until creamy. Slowly add confectioner's sugar and milk. Beat until well-combined and creamy. 

Spread frosting over the top of the cooled bread.

In a small saucepan, stir together brown sugar and water. Dissolve sugar over medium-high heat. Continue heating until caramel turns dark brown and starts to boil, making sure to stir constantly to avoid burning. Add butter and salt. Stir to combine and remove from heat. Continue stirring for another 1-2 minutes to cool the caramel somewhat before drizzling over the top of the frosting. 

Slice bread and serve! Store leftovers in the refrigerator.

Recipe Source:  Bread from Nancy Creative, Buttercream and Caramel from A Kitchen Addiction

Thursday, September 20, 2012

Quinoa with Corn and Scallions


Here's some more quinoa goodness for you.  It turned out fabulously and with the addition of corn, you have 2 side dishes in one :)  

Quinoa with Corn and Scallions

4 ears corn, shucked
1 Tablespoon grated fresh lemon zest 
2 Tablespoons fresh lemon juice
½ stick (¼ cup) unsalted butter, melted
1 Tablespoon honey
½ teaspoon salt
¼ teaspoon black pepper
2 cups uncooked quinoa 
4 scallions, chopped

Place the corn in a large pot and fill it with enough water to cover the corn. Cover the pot and bring it to a boil. As soon as the water comes to a boil, turn off the heat and let the pot stand, covered, for 5 minutes.

Remove the corn from the pot and let it cool on a cutting board until it's easy to handle. Then, using a sharp knife, cut the kernels off the cob.

Prepare the dressing by whisking together the lemon zest, lemon juice, melted butter, honey, salt and pepper in a large bowl.

Rinse the uncooked quinoa in a sieve under cold water until the water runs clear.

Cook the quinoa in a pot of of boiling salted water per the package directions.

Add the quinoa, corn kernels and chopped scallions to the bowl with the dressing and toss until it's evenly coated. Season with salt and pepper and serve.

Recipe Source: Taste Test

Saturday, September 15, 2012

Feta and Pesto Stuffed Pork Chops

It was 4:00 and I had a full day of things to think about other than dinner.  I knew I had to use up my pork chops in the refrigerator, so I did a quick search and found that I had everything for this recipe.  I'm glad I found it!  The flavors were great, and anything with pesto in it usually makes me quite happy :)  These only took me about 10 minutes to put together...so next time you find yourself in a pinch for dinner, give these a try...they are great!

Feta and Pesto Stuffed Pork Chops

3 tablespoons crumbled feta cheese
2 tablespoons chilled basil pesto
1 tablespoon toasted pine nuts
4 bone-in pork loin chops, 1 1/4-inch thick
1 teaspoon ground black pepper
1 teaspoon dried oregano
1 teaspoon minced garlic
1/2 teaspoon red pepper flakes
1/4 teaspoon ground thyme
2 tablespoons balsamic vinegar

Preheat oven to 375 degrees F (190 degrees C).

Mix feta cheese, basil pesto, and pine nuts in a bowl. Use the tip of a sharp boning or paring knife to cut a 3-inch slit in the side of each pork chop, 2 inches deep and 1/4-inch away from the bone, to make a pocket for stuffing. 

Stuff pork chops with pesto filling and secure with toothpicks.

Mix black pepper, oregano, garlic, red pepper flakes, and thyme in a small bowl; rub both sides of each chop with the spice mix. Place chops into a shallow baking dish.

Bake in the preheated oven until chops are browned and stuffing is hot, about 40 minutes. An instant-read meat thermometer inserted into the center of the stuffing should read 145 degrees F (63 degrees C). Brush chops with balsamic vinegar and bake until vinegar forms a glaze, another 5 minutes.

Recipe Source:  Allrecipes


Monday, September 10, 2012

Chicken Bacon Cheddar Ranch Pasta


I am all about my super fast weeknight meals lately. As of right now, we only have one car after having to sell one when we moved across the country. Having to go pick up my husband right in the middle of prime dinner-prep time has presented some problems! The crockpot and quick skillet meals have saved me lately.

This pasta was easy to put together, and the sauce is absolutely awesome! You won't be disappointed in this quick dish!

Chicken Bacon Cheddar Ranch Pasta

1 pound mostaccioli or other short pasta
6 strips of bacon, diced
1 tablespoon butter
2 boneless skinless chicken breast halves, cut into bite-size pieces
2 tablespoons all-purpose flour
1 packet ranch dressing mix
2 cups milk
1 cup shredded cheddar cheese
Salt and pepper to taste

Cook pasta according to package directions in boiling salted water; drain, return to pot, and keep warm.

Meanwhile, cook bacon in a large skillet over medium heat until crisp. Drain on paper towels. Drain all but one tablespoon of bacon drippings from the pan.

Season the chicken with salt and pepper. Add the butter to the reserved bacon drippings, then add the chicken to the same skillet. Cook until tender, no longer pink, and slightly browned.

Sprinkle the flour and ranch dressing mix over the chicken, stirring to coat evenly. Stir in the milk, and cook, stirring occasionally, until thickened and bubbly. Stir in the cheddar cheese and half of the reserved bacon; cook and stir until the cheese is melted. Taste for seasoning and adjust as needed.

Serve each plate of pasta with more bacon sprinkled over the top. Green onions would also be a delicious topping.

Recipe Source: Cassie Craves

Sunday, September 9, 2012

BBQ Burger with Secret Sauce

I have a hard time letting go of grill season.  I do.  So I will probably have a few more recipes to share that make you think summer rather than fall.  Oh well, I'll get to the fall recipes soon enough :)  This recipe in particular is a great way to fulfill your grill craving, even in the middle of the winter!

This burger is full of flavor and turned out super yummy and juicy.  The trick to these is to use an indoor grill pan, they are too fragile to head outside (your burger will probably fall through the grates of the grill.  Enjoy :)

BBQ Burger with Secret Sauce


2 lbs ground beef 85/15
sesame seed buns
1/2 cup of grated Monterrey jack cheese
1/4 cup BBQ sauce
season salt to taste
cracked black pepper
onion powder
Secret Sauce
3/4 cup of mayo
1/4 cup ketchup
1/4 cup relish
2 tablespoons worcestershire
seasoned salt

Combine the ground beef, grated cheese, bbq sauce, and seasonings. Shape patties that are about 1 inch thick.

Then it is very important to push a 1/2 inch indent into the center of the patty–this is what prevents the patty from becoming a dome. These burgers stay extra moist because the bbq sauce and cheese are mixed in with the meat.

Wait for the skillet to get super hot and then apply a very thin layer of butter to the pan. Place the patties on the pan, indent side up.

Reduce heat to medium and allow this side of the patty to cook for about 4-6 minutes, but make sure it doesn’t burn. Then flip the burger over and cook until done.

For the sauce: Combine all ingredients and whisk until well mixed. Taste and adjust ingredients to your liking.

Assemble the burgers and serve with avocado, lettuce or your choice of toppings!

Recipe Source:  Little Miss Momma


Wednesday, September 5, 2012

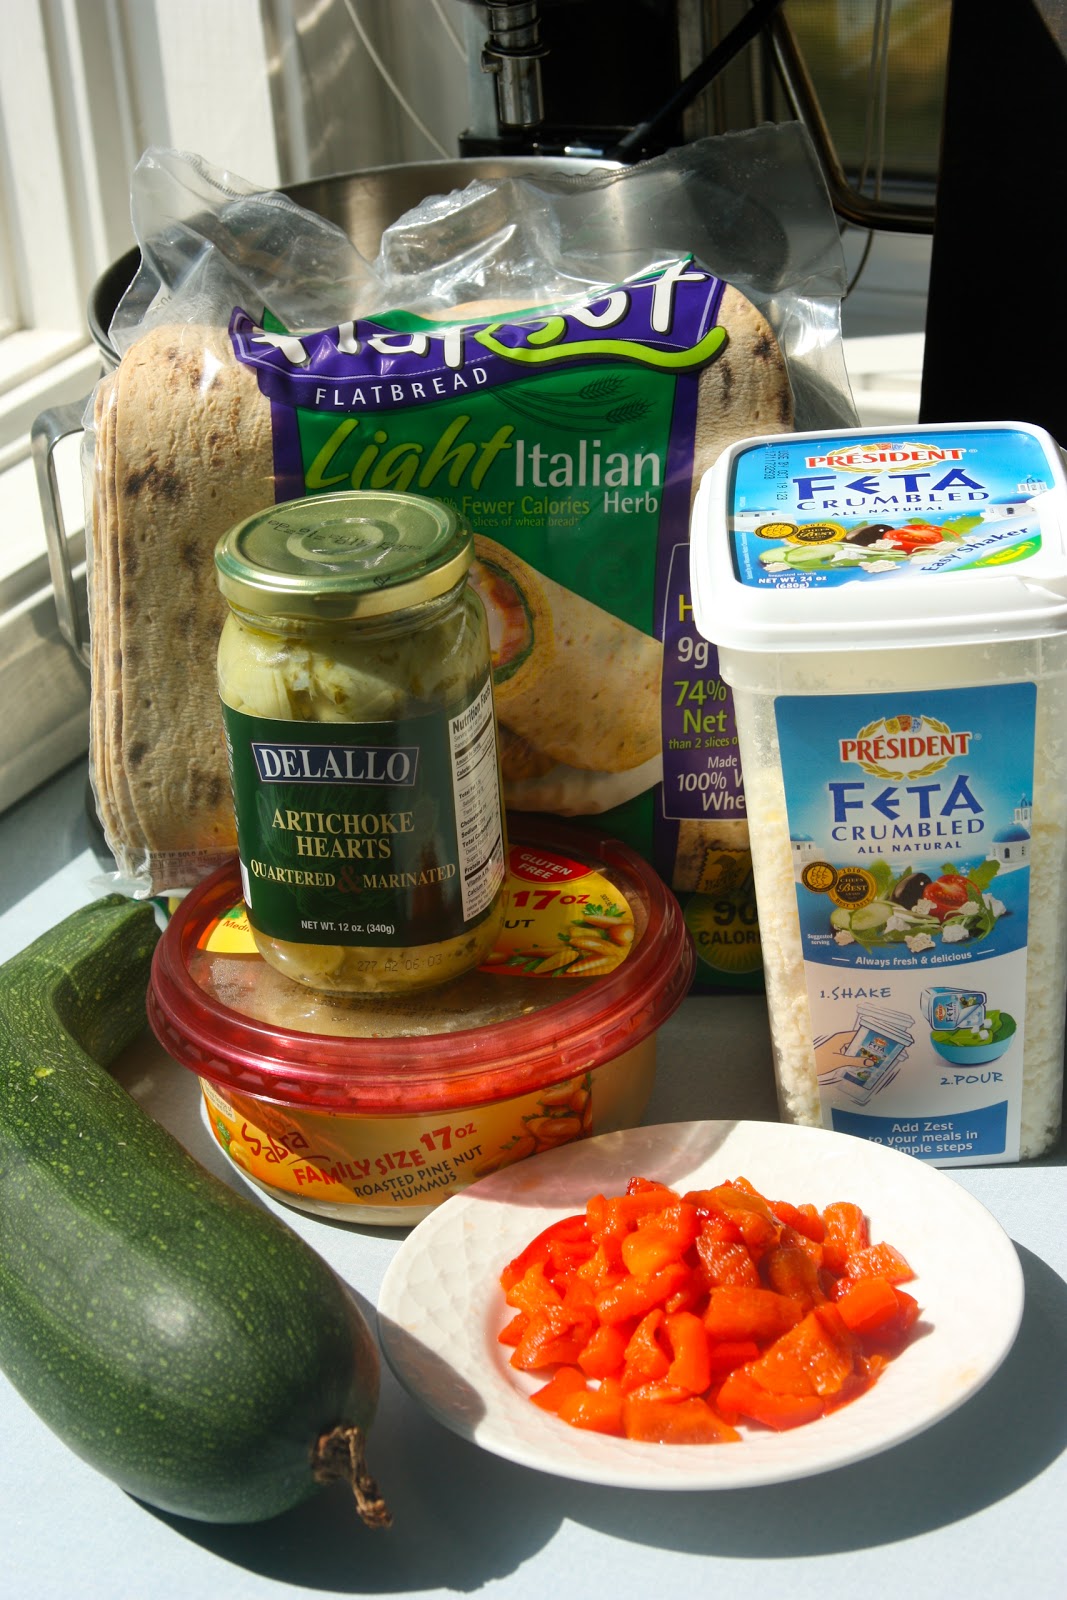
Mediterranean Flatbreads

I am all about zucchini lately.  I have made a couple batches of Zucchini Nut Bread, had these Zucchini Sticks, ate them with my feta pork chop skillet, and one of my favorite meals, Copycat Spicy Chicken Teriyaki Rice Bowl with Rumbi Rice.  I was excited when I saw this recipe, though, because Mediterranean cuisine is my new favorite.  Especially since my favorite Mediterranean place is now thousands of miles away and I crave it constantly!

It is a great way to have a vegetarian lunch or dinner without feeling cheated of not having meat. The flavors rock, and I'm pretty sure these will make an appearance on my lunch rotation for myself a few times a week :)


  • Mediterranean Flatbreads

  • 1 package flatbread pitas (Mine were a little to thin, I'll look for thicker ones next time)
  • 1 tub of hummus
  • 1 bottle of roasted red peppers (you can find these by the pickles in your grocery store)
  • 1 bottle of artichoke hearts (also by the pickles)
  • 1 carton cherry tomatoes (left these out)
  • 2 to 3 small zucchinis
  • 1 container of crumbled goat cheese (or tomato and basil feta, or regular feta)
  • Cut the zucchini into bite size pieces and saute it in a fry pan with a tiny bit of oil, just until it begins to look cooked (you don't want it to get too soft). Then chop up the roasted red peppers and artichoke hearts into small pieces.
  • Take a flatbread pita and generously smother it with a layer of hummus (like you would pizza sauce). Top the hummus with the red peppers, artichoke hearts, zucchini, tomatoes, and then sprinkle all over with goat cheese.
  • Place the pizzas on a cookie sheet and place under the broiler until the tops of the pizzas begin to get toasted. This only take a few minutes so watch it closely!
Recipe Source:  Favorite Family Recipes

Tuesday, August 28, 2012

Chubby Hubby Truffles

Well hello there....I am glad our paths crossed :)  These little babies are a sweet/salty lover's dream....pretzels, peanut butter, chocolate, and caramel.  Amazing!  My hubby thought these tasted just like a Take 5 Bar, and I'd have to agree.  They are totally delicious.

I sent these to work with my hubby so I didn't gain back those 5 pounds I just lost!  Once again, he brought home a clean tray and everyone seemed to LOVE them.  If you like these, also try the Chubby Hubby Bars I made last week inspired by Ben and Jerry's popular Chubby Hubby flavor.  


I tell you what, make up a batch of these for your next gathering of friends, college football party, Labor Day BBQ, baby shower, etc and you will be getting compliments forever ;)


Chubby Hubby Truffles


1½ cups pretzel pieces
½ cup creamy peanut butter
1 tablespoon unsalted butter, at room temperature
2 tablespoons light brown sugar
Pinch of salt
3 tablespoons powdered sugar
1 cup milk or semisweet chocolate chips
1 tablespoon vegetable shortening

1. Put the pretzel pieces into a resealable plastic bag and crush into very small bits (a rolling pin works great for this).

2. In a small bowl, combine the peanut butter, butter, brown sugar and salt. Stir until all of the ingredients are completely blended and smooth. Add the pretzel bits to the peanut butter mixture and mix thoroughly. Add the powdered sugar and mix until completely combined.

3. Line a small baking sheet with wax paper. Using a small cookie scoop, or about 2 teaspoons worth of peanut butter mixture, gently shape into a ball with your fingertips. Place the ball on the wax paper-lined cookie sheet and repeat with the remaining peanut butter mixture. Place the baking sheet into the refrigerator and chill for at least 30 minutes.

4. When ready to dip the truffles, microwave the chocolate chips and vegetable shortening together in a small bowl at 50% power in 30-second increments, stirring after each, until completely melted and smooth.

5. Working one at a time, dip one peanut butter-pretzel ball into the melted chocolate and use a fork to roll it around, ensuring that it is completely coated with chocolate. Let any extra chocolate drip off and place back on the wax paper-lined sheet. Repeat with all of the peanut butter-pretzel balls. 

6. Return the baking sheet to the refrigerator and again chill for at least 30 minutes. Garnish with a drizzle of melted peanut butter and crushed pretzels, if desired. Store in an airtight container in the refrigerator.


Recipe Source:  Brown Eyed Baker

Monday, August 27, 2012

Italian Grinder

So we went to Costco the other day, and after sampling the deliciousness of the salami I ended coming home with a couple packages.  Now what to do?!  I wasn't going to eat the entire package as-is!  I looked back to my good old list of recipes I wanted to try, and this one popped up.  These turned out really yummy and super easy.  It's good for those weekdays when you have NO time because of crazy-busy schedules.

We also made some pizza with the sauce, cheese, more pepperocinis, pepperoni, salami, olives, and mozzarella cheese (sorry, no pic...got gobbled up too fast!).  I am also thinking about an antipasto salad of some sort...stay tuned for that!

Italian Grinder

1 Crusty hoagie
Mayonnaise, to taste
Ham
Salami
Pepperoni
3 slices of provolone
Shredded lettuce
Tomato slices
Pepperocini
Italian dressing, to taste
Sea salt and freshly cracked pepper, to taste
Crushed red pepper, to taste

Spread mayonnaise on each side of each side of the hoagie bun. Layer each side of the hoagie with ham, salami, and pepperoni then layer the provolone cheese down the center. Place into the broiler (on low) and cook, watching carefully, for 2 minutes or until the cheese is melted.

Place the lettuce down the center followed by the tomatoes and pepperocinis. Drizzle the top with Italian dressing, to taste and a sprinkling of sea salt, freshly cracked pepper, crushed red pepper, to taste. Serve immediately. Enjoy.

Recipe Source: For the Love of Cooking

Wednesday, August 22, 2012

Zucchini Sticks with Bloomin' Onion Sauce

Here's a post I shared over at Kiki Creates earlier this week.  Go check out all the fun things on Kiki's site!  {click button below}

I was sad when we moved out into the country mid-summer and missed my chance to plant some yummy veggies.  This year, my veggies are coming from the grocery store and farmers markets.  Oh well, there's always next year!  I know there are many of you with zucchini coming out your ears, and there are only so many loaves of zucchini bread you can take :)  I wanted to introduce you to a side dish we had recently that was AWESOME!  I have had variations of zucchini sticks (or fries) before with a side of marinara, but this dip rocks!  It gives it a whole new flavor, and you can use it as a spread on sandwiches, burgers, dip your chips in it, etc.


Zucchini Sticks with Bloomin' Onion Sauce

DIP

1 tablespoon butter
1 medium sweet onion, about 1/2 pound, peeled and sliced
2 tablespoons cider vinegar
2 tablespoons honey
1 tablespoon prepared mustard
1 cup mayonnaise
salt and pepper to taste

ZUCCHINI STICKS

3 medium zucchini, unpeeled, cut into 3"-long stick
1 tablespoon salt
1 cup Panko bread crumbs
scant 1/2 cup freshly grated Parmesan cheese
1 tablespoon Pizza Seasoning or mixed Italian herbs
olive oil spray
1/2 cup egg substitute; or 2 large eggs; or 3 egg whites, lightly beaten

1) To make the dip: Melt the butter in a medium frying pan over moderate heat, and add the sliced onions. Cook, stirring occasionally, until the onions soften, then caramelize. This should take between 10 and 15 minutes. The lower the heat, the longer it takes, but the less likely you are to burn the onions.

2) Once the onions are a medium brown, remove from the heat and add the vinegar.

3) Place the onions and vinegar into a small food processor. Add the honey and mustard, and process or blend until smooth.

4) Add the mayonnaise and salt and pepper to taste, stirring to combine. Refrigerate, covered, until ready to serve.

5) To make the zucchini sticks: Place the zucchini sticks in a colander over a bowl and sprinkle with the tablespoon of salt. Let the zucchini drain for 1 hour or longer; rinse and pat dry.

6) Combine the Panko, Parmesan, and pizza seasoning; set aside.

7) Preheat the oven to 425°F. Line a baking sheet with parchment, and spray the parchment with olive oil.

8) Dredge sticks a few at a time in the egg, then roll in the crumb mixture. Place the sticks on the prepared baking sheet.

9) Bake sticks for 12 minutes, turn over, and bake for an additional 8 minutes, until golden brown and crisp.

10) Serve immediately, with sweet onion dip.


Any leftover sticks can be wrapped and stored in the fridge. Reheat at 350°F for about 10 to 15 minutes, if desired.
Yield: about 3 dozen zucchini sticks, and 1 1/2 cups dip.

Recipe Source:  King Aurthur Flour

What is your favorite way to enjoy zucchini?


Thursday, August 16, 2012

Chubby Hubby Bars


Well, I know you love the name of these bad boys!  And doesn't the name just say "GOOD FOR YOU!" Ha!  You know how at the top of my blog it says Sometimes Healthy, Sometimes Delicious, Always Yummy? This is the indulgent portion of my blog for you :)

My husband is FINALLY working in his profession after many years of schooling.  Now he thinks I need to make treats for him to take into work all the time.  This really works out for me on many levels.  1) I am a food blogger, I like to cook.  2) My thighs will like me better.  I love to make sweets, and if I get to make them, taste them, and send the rest off for others to eat....all is well with the world!  3) I get to make new friends by bribing them with dessert.  

See.  Things are good around here!

Onto these bars.  They were inspired by Ben and Jerry's ice cream flavor.  I applaud those people that can come up with recipes like these.  And I am thankful they are willing to share :)

*UPDATE!  The hubs came home from work with a clean tray, excellent reviews, and some of his co-workers did not even get any...guess I better double my batch for next time :)

Chubby Hubby Bars


2 1/2 cups all purpose flour
1 cup (2 sticks) butter, room temp
1 cup brown sugar
1/2 cup white sugar
2 eggs
2 tsp vanilla
1 tsp baking soda
1 tsp coarse sea salt
1 1/2 cups coarsely chopped pretzels
1 (8oz) bag of Reese’s Mini cups (or 2 cups coarsely chopped full sized Reese’s)
1 (14 oz) bag of caramels, unwrapped
2 Tbsp water
2 cups semi sweet chocolate chips, melted
How to Make

Preheat oven to 350.

Spray a 9×13 pan lightly with cooking spray.

Beat together your butter and sugars until light and fluffy, approx 1 min.  Add eggs and vanilla, mix until incorporated.  On low speed add in your salt, baking soda and flour, mixing until just combined.
Slowly add in your Reeses and Pretzels, mixing until evenly distributed.  Spread in your prepared pan and bake for 25 minutes.  Let cool completely. Approx 30 minutes to an hour.

When cooled, melt your caramels and 2 Tbsp water in a microwave safe bowl stirring every minute until melted.  Pour over your bars.  Chill in fridge for 15 minutes to set caramel.

Melt your chocolate chips in a double boiler or microwave and spread over caramel.  Put back in the fridge for at least 30 minutes or until chocolate is set.  Cut into squares when ready to serve. The caramel will start to "leak out" after they sit for just a bit.  It is fabulous!

Recipe Source: Cookies and Cups


Wednesday, August 15, 2012

Turkey Wrap with Cucumber Cream Cheese


  • Summer lunches for me generally consist of some sort of salad thrown together with whatever is on hand, sandwiches, or leftovers from the night before.  Every now and again I get on these kicks for making all sorts of wraps, which I love greatly and are so simple to make.  This one has 4 ingredients...including the tortilla.  Talk about a no brainer!  It reminds me of one of my favorite sandwiches from Einstein Bagels...yummy :)

  • Turkey Wrap with Cucumber Cream Cheese

  • 1/4 cup chopped cucumber
  • 4 tablespoons softened cream cheese (or hummus, or laughing cow wedge)
  • 3 flour or wheat tortillas
  • 1/4 pound sliced smoked turkey breast
  • (some sandwich sprouts would taste awesome on this as well :)

  • Stir cucumber into cream cheese, spread on tortillas, layer with turkey slices and roll up.

  • Recipe Source: Everyday with Rachael Ray